
FrontPage 2003 and CSS - Creating CSS
Inherited styles
About styles
Create a cascading style sheet
Link to an external cascading style sheet
Create an embedded CSS
Resources for CSS
Inherited styles
Like a child inherits blue eyes from their parents, so can child elements inherit the styles of their parent element.
For example: By using the BODY element to declare such properties as the font-family and color, all the other elements on the HTML file will inherit the body styles because the BODY is the Parent, so one does not need to set the font and colour for all the other elements on the page.
If any attribute is shared amongst your elements, they should always be in the BODY tag.
For example
| BODY {
font-family: Arial,Helvetica, sans-serif; color: red; } |
Now the rest of the HTML file will inherit the font-family and the colour.
However, be advised that different browsers look at things in different ways, so you should test your files in other browsers. If you don't have them on your computer you can use AnyBrowser.
Here is a Table of what Browsers support.
Learn more about Cascading and Inheritance:
A style is a set of formatting characteristics identified by a unique name. Styles enable you to quickly format a whole group of page elements in one simple task.
You can apply styles to most page elements in Microsoft FrontPage, including text (individual characters or entire paragraphs), graphics, and tables.
About built-in and user-defined styles
With FrontPage, you can choose from a group of built-in styles, or you can create your own user-defined styles. Built-in styles are frequently used formatting options available by default in the Style box. User-defined styles can be modifications to built-in styles, or class selectors (class selector: In cascading style sheets, a name identifying a user-defined style. Depending on how it's defined, a class selector can be used with a single type of tag or with any HTML tag inside the BODY element.) that you create.
You can access both built-in and user-defined styles from the same style list when you're editing a page.
Using styles with page elements
You can choose from several categories of styles.
Paragraph-level style is a combination of character- and paragraph-formatting characteristics that are named and stored as a set. You can select a paragraph and use the style to apply all of the formatting characteristics to the paragraph at one time.) style is usually applied to start and end paragraph tags (<p>) and can affect any text contained between those tags. In addition, a paragraph-level style can also be applied to other tags, such as <div>.
Examples
 <<This graphic represents a paragraph-level style with the addition of a
border around text.
<<This graphic represents a paragraph-level style with the addition of a
border around text.
This graphic represents a paragraph-level style with the addition of a
border around an image.>> 
Character-level style is a combination of any of the character-formatting options that are identified by a style name and applies to just the text within a paragraph.
Example
 The text shown in the example on the left has three
words in bold and red — the result of a character-level style being
applied. Page element styles
The text shown in the example on the left has three
words in bold and red — the result of a character-level style being
applied. Page element styles
Some page elements have a Style button on their properties dialog box. These allow you to add styles specific to that particular page element.
Example
The table in the following example has a blue outset border, which is the result of a style being added through the table property options.

NOTE: If you apply a user-defined style to a page element that is already formatted with a standard HTML tag, both formatting characteristics are used.
For example, if you select a paragraph styled as Heading 1, and then apply a user-defined style named .redbg that adds a red border, you get the standard Heading 1 formatting (Times New Roman, Bold, 24 pt, and left-aligned) surrounded by a red border.
The class name of the user-defined style is appended to the end of the HTML tag in the Style box, listing the new style as Heading2.redbg.
Create a cascading style sheet
Do one of the following:
Create an external cascading style sheet (CSS)
- On the ‘File’ menu, click ‘New’.
- In the ‘New task’ pane under ‘New page’, click ‘More page templates’.
- On the ‘Style Sheets’ tab, click the type of CSS you want to create. For our purposes, I suggest ‘Normal Style Sheet’.
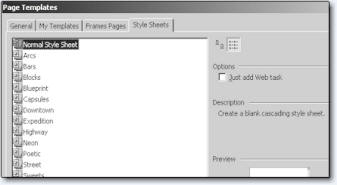
NOTE: FrontPage comes with a selection of CSS templates that you can use. In fact, it’s a good idea to open one to see what a full sheet looks like.
FrontPage creates a new page with a .css file name extension and opens it for editing. Before you can link the .css file to a Web page, you must save it.
NOTE: When editing a .css file directly in FrontPage, you can use the ‘Style' dialog box to create additional class selectors, modify or delete existing ones, or apply cascading style sheet formatting properties to standard HTML tags such as <h1>. When you click OK to close the dialog box, FrontPage writes the formatting characteristics back to the external or embedded style sheet, using the proper syntax.

Change the styles used in a theme
1.On the ‘Format’ menu, click ‘Theme’.
2. In the ‘Theme task’ pane point to the thumbnail for the theme you want to change, and then click the arrow.
3. Click ‘Customize’, and then click ‘Text’.
4. In the ‘Item’ box, click the item for which you want to change the style.
5. Under ‘Font’, click the font you want to use.
6. Repeat steps 4 and 5 for each item you want to change.To view other options for changing the theme's style, click ‘More Text Styles’.
7. Click OK and then click ‘Save as’.
8. Type a new name for the theme (unless you have changed a custom theme), and then click OK.
NOTE: When you modify a preset theme, you must save your changes as a new theme.
Link to an external cascading style sheet
- In ‘Page view’, at the bottom of the document window, click ‘Design’.
- On the ‘Format menu’, click ‘Style Sheet Links’, and then click ‘Add’.
- Locate and click the .css file for the external cascading style sheet (CSS) and then click OK.
- Do one of the following:
- To link the external CSS to only the current page, click ‘Selected page(s)’.
- To link the external CSS to all pages in the current Web site, click ‘All Pages’.
Tips:
To remove a style sheet from the URL list, select it and click
‘Remove’.
To change the cascading order of the style sheets in the URL list, select the style sheet that you want to move and then click ‘Move Up’ or ‘Move Down’.
NOTE: The URL list is the order in which the style sheets will cascade, so be certain that the order you see is the order in which you want your style sheets to cascade.
Caution!
If you select ‘All Pages’ in the ‘Link Style Sheet’ dialog
box, FrontPage will erase all style sheets that are on your pages and
replace them with the new style sheet choices that you have selected.
This can be a quick way to apply new styles to your entire Web site but
can cause problems if you didn't intend to remove existing style sheets.
Create an embedded CSS (Cascading Style Sheet)
To create an embedded CSS, you must define a style that you want to include in it.
- In ‘Page’ view, at the bottom of the document window, click ‘Design’.
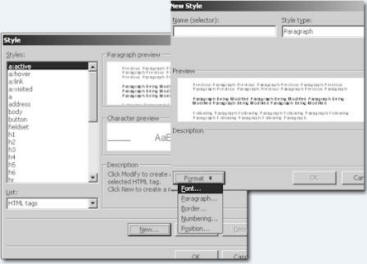
- On the ‘Format’ menu, click ‘Style’.

You can also bring up the ‘Style Toolbar’ by right clicking on an unused area at the top of FrontPage and selecting the ‘Style Toolbar’.
Click ‘New’, and then in the ‘Name’ (selector) box, type the name of the new style which is going to be a Class Style which appears as .nameofclass. Class Styles are always lowercase, all one word and have a period at the front.
Under ‘Style Type’, choose whether the style will be a ‘Paragraph’ or ‘Character’ style.
Click ‘Format’, and then specify the formatting characteristics for the new style.
NOTE: When you apply a style directly to an item using the ‘Style’ button on its ‘Properties’ dialog box, the style is applied directly to the element, creating what is called an’ inline cascading style sheet’ (CSS).
When you save your HTML file, your Embedded and Inline styles are automatically saved along with your file.
You can always cut the embedded sheet from the HTML file and put it into a External sheet just snip everything that lies in your head tags from where it says <style> to </style> and insert into the external sheet.
Resources for CSS
Free Course: HTML and XHTML for CSS
Validators and Checkers
All articles are Copyright © 2004 Tina Clarke All Rights Reserved