
Image Composer Sprites & Compositions
Sprites and Compositions
Image Objects
Transparency
The work cycle
Changing colors
Making cutouts
Creating shadows
Sprites and Compositions!
Creation of images in Image Composer is built around sprites, or image objects that can be manipulated and modified in any number of ways individually or in groups, and which can be saved as individual files or as groups in a composition. The use of sprites makes it easy and efficient to save reusable parts as components that can be incorporated into other images, and also to experiment with different effects in whole images or parts of them. (But remember that Image Composer only has one level of "undo" capability, meaning that only the immediately previous action can be reversed, so use the
duplicate function to create copies of your original sprites to experiment on.)
A composition in Image Composer, which is saved as a file, is a combination of sprites against a background. By default, new compositions have a white background, and are 640x480 pixels in size. You can change these values by right-clicking in any blank (non-sprite) area of the composition and choosing Properties. If you want some other values for all your new compositions, you can change the defaults by clicking Options under Tools on the menu.
To think in Image Composer terms:
Every workspace in IC contains a composition space.
The composition space can be thought of as the frame for your work.
The area around this space can be thought of as your tabletop.
You cannot draw directly on this composition space, however you can create shapes that can be placed there, and you can also paint these shapes if you wish.
Image Objects!
Compositions are collections of image objects. In Image Composer, image objects are called Sprites. A sprite has shape and transparency, as shown in the figure below.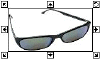 Because sprites are objects, you can use your mouse to move them in the workspace like you move icons on your Windows desktop. Each sprite is surrounded by a rectangular space called a bounding box. This box provides a frame of reference and the handles show what you can do with the sprite, such as resizing or rotating, as shown in the preceding figure. You can combine sprites temporarily or permanently.
Transparency!
Sometimes, what you cannot see is as important as what you can. With Image Composer, what you see depends on transparency, which is a property of sprites. Transparency is specified in levels of opacity, from 0%, completely transparent, to 100%, completely opaque. It is carried in the alpha channel, which carries opacity like the red, green, and blue channels carry colour. Many effects and tools have opacity controls. You can use transparency in a variety of ways, including:·
![]()
- Using transparency to paint with as if it were a colour
- Erasing portions of a sprite with varying percentages of opacity.
- Letting a Web page background show through a sprite.
The work cycle!
Working with Image Composer is simple, intuitive, and encourages you to experiment. The following figure illustrates the work cycle.
 |
1 The first step in working with Image Composer is to insert or open an image, or create a new sprite.
2 The next step is to select the sprite.
3 Then, choose the effect or tool that you want to use.
4 For most effects and tools, click Apply as the final step. If you are unhappy with the results, click Undo and apply new effects.
Changing colors!
Colors provide drama, emotion, and information at a glance in a way that few other things can. In Image Composer, you work with a current color for many applications, including many effects. The Color Swatch at the bottom of the toolbox shows the current color. Changing the current color does not affect the color you see in your current sprite until you perform an action. To change the current colour, follow these steps:
1 Right-click the Color Swatch to display the compact Color Picker, shown in the following figure. Left-click the Color Swatch to display the full-size Color Picker.
![]()
2 Click the circle in the middle of the color matrix and drag it to the color you want to change to.
3 Click OK. The new color you set to be the current color will be applied to all future actions that use the current color.
Making cutouts!
A common task in creating images is cutting out a portion of the sprite. Use the cutout as a separate sprite, as a mask while applying effects, as a base for animations, and more. Like most tools, cutout tools are on a tool palette. Click the Cutout button on the toolbox to activate the Cutout tool palette. Create cutouts in common shapes or freeform shapes. The following figure shows the original photo, a cutout made with the oval tool, and a cutout made with the curve tool over a new sprite.
 |
The steps involved in creating cutouts are simple. Select the object you want to cut out a portion from. Then click the cutout button on the toolbox. Select a cutout tool to use. Select the portion you want, cut out that portion, and you are done!
Creating shadows!
One of the easiest ways to add depth and impact to an image is to use a drop shadow, one that closely follows the outline of a sprite. With Image Composer, you can easily create drop shadows in any color, level of transparency, angle of light source, and degree of hardness. The following figure shows several variations, starting with the default drop shadow at the left. To create a drop shadow, select a sprite, then:

1 On the toolbox, click Effects.
2 In the Category box, click Outlines, then click Drop Shadow.
3 On the Details tab, Customise the shadow, then click Apply.