
Arrange Palette: Cropping and Resizing Images
To insert a sprite into your composition
How to use the Crop/Extend button
To crop a sprite
Extending the bounding box of a sprite
Further Help
To insert a sprite into your composition:
1 Open a new composition
a Select Insert
b From File
 To insert a sprite into your composition.
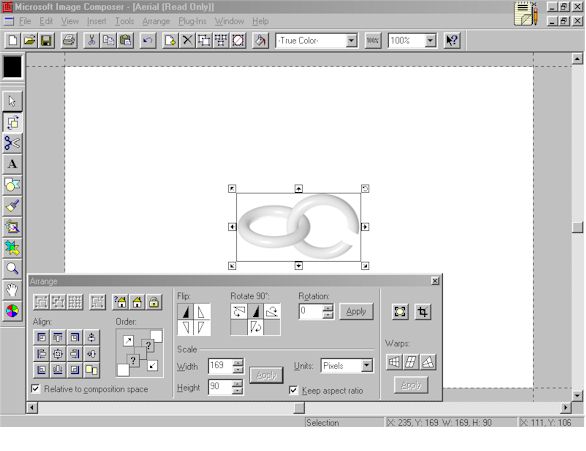
I used the chain2.mic file from the Image Composer CD, you can find this image in the e:\Imgcomp\Common\Mmfiles\Photos\Shapes\ directory.
Note: If you want to use the catalog that comes with IC, you can find the sprite files in a folder named e:\Imgcomp\Common\Mmfiles\ on your CD (where e:\ is the name of your CD ROM). When you install IC you have the option to install the sprite catalog or to work from the CD if you don't have enough disc space.
2 Click the Arrange button in the Image Composer Toolbox to bring up the Arrange palette.
There are two options when you resize an image using the Arrange palette.
i Work in Pixels
ii Work in Percentages
For this example the units option was initially set to Percent.
a Click one of the arrows next to the box labeled 'Width'
If you click on the down arrow, the number goes down. If you click on the up arrow, the value increases.
3 After selecting a value, click the 'Apply' button next to the 'Width' and 'Height' boxes to resize the image.
Note: After you click 'Apply', the Units box changes back to Pixels.
 Click to view
Your workspace should look something like the picture above. (click to view).
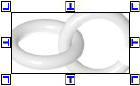
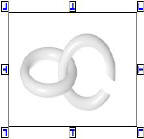
Now supposing that you want the sprite to have a more transparent area on the right side, maybe you want to use the sprite as a tile. To achieve this click the Crop/Extend button and cropping handles appear around the image. Clicking and pulling the cropping handle away from the centre of the sprite creates more transparent space.
How to use the Crop/Extend button:
Crop decreases the size of the bounding box around a sprite and trims the excess area of the sprite. Extend enlarges the bounding box around a sprite and creates a margin of transparent pixels around the sprite.
| Original Image |
 |
| Cropped Image |
 |
| Extended Image
|
 |
To crop a sprite:
1 Select the sprite you want to crop.
2 On the toolbox, click Arrange .![]()
3 In the Arrange palette, click Crop/Extend .![]()
This turns the the default sizing handles into Crop/Extend handles.
4 Position the pointer over a cropping handle, and drag that handle to a new location. You can click and drag each cropping handle many times until the image is cropped the way you want.
5 Click away from the sprite.
Extending the bounding box of a sprite:
Work through steps 1-3 as for 'To crop a sprite'
4 Position the pointer over a cropping handle, and drag that handle away from the sprite. You can click and drag each cropping handle many times until the bounding box is extended to the size you want.
5 Click away from the sprite.
To minimise the transparent space around the sprite, click the 'Fit Bounding Box' button. This gets rid of extra space around the sprite and lets you cleanly remove excess transparent pixels.
Note: The 'Keep Aspect Ratio' check box is checked while the image is resized in these steps. When you have the box checked this takes the place of holding down the Shift key while you drag the corner to resize an image. If you want to distort the image, you can uncheck the is box and set the width and height values to what you want.
Further Help:
In the Image composer Help Topics (Alt, Shift+ H) if you put in the following headings in 'Find' you will be greeted with more topic headings for further help under this section.
Arranging and resizing sprites
Flipping a sprite
Rotating a sprite
Resizing a sprite
Cropping a sprite
Aligning sprites with each other
Aligning sprites with the composition space
Grouping sprites
ungrouping sprites
Exploding a group
Flattening a selection
Changing the order
setting a home position
Locking a sprites position
Adjusting the bounding box to fit sprites
Warping a sprite