
FrontPage 2002 Tutorials - Adding functionality to your website with FrontPage 2002 Part II ~ Navigation.
by Tina Clarke
(some tutorials cover FrontPage 2000 as well)
Creating and Inserting a Navigation Structure
The bigger the website, the more important it is that your visitors should be able to navigate through your site. There are a number of ways to accomplish this and one of the most effective tools is the navigation bar, which is actually a collection of hyperlinks used to guide visitors through a website. The hyperlinks usually lead to primary pages, such as a contact page or the site’s home page. Link bars can be placed on every page of your web site, so visitors can easily navigate without losing their way, the bars can have buttons or text hyperlinks.
There are three types of link bars.
CUSTOM LINK BAR – You can import web pages from your site or external sites.
LINK BAR WITH BACK AND NEXT LINKS – This utilizes your navigation system to track the last page that a visitor has read as well as the next page in the web site.
LINK BAR BASED ON YOUR SITE’S NAVIGATION STRUCTURE – This uses the Navigation View structure to determine which hyperlinks to include on its bar and what to call them.
NOTE: Link bars can only be generated when you’re working within a web site and not on separate pages. Also you can add and view any type of link bar when you publish to a disk-based web site. However, when you publish to a Web server, in order to be able to add a custom link bar or a link bar with back and next links, your Web server must have Microsoft FrontPage Server Extensions 2002 or SharePoint Team Services from Microsoft installed.
Add a Custom Link Bar:
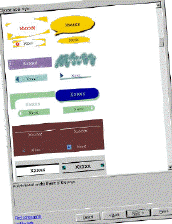
Position the cursor where you want your link bar. Choose Insert | navigation and the ‘Insert Web Component’ Dialog box opens. In the right pane, click ‘Bar With Custom Links’. Click Next and the dialog moves on to open up with a selection of link bar styles. Select the style you want, click Next and the Dialog box then asks you to select an orientation for the link bar.
NOTE: If you don’t make a link bar style selection, another dialog box will appear, asking you to select a link bar style.
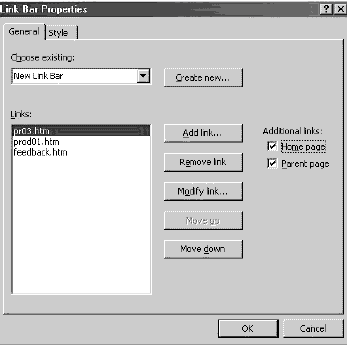
When you have selected your orientation click Finish and ‘Link Bar Properties’ Dialog box opens. Click ‘Create New’ and type a name for your new link bar, click OK. Click ‘Add link’ and find the page you want to be on your custom link bar, select it by clicking it. Or, type its URL in the ‘Address’ box.
In the ‘Text to display’ box; type the text you want to show on the link bar.
Click OK. Repeat these steps for each link you want to add to the link bar. The page appears with +Add Link as a placeholder.
Creating Back and Next Links:
A simpler method of navigation is to use the back and next links.
When you add a page to a link bar with back and next links, Microsoft FrontPage determines the order of how the pages will be linked (using the back and next buttons) from how the pages are ordered in the folder structure.
In addition to these choices for a link bar, you can also include hyperlinks to the web site's home page and/or to the parent of the current page, and you can also link to external web pages.
In Page view | Insert | Navigation | Right pane click ‘Bar with Back and next links’. Click Next and select the link bar, or, if your page uses a theme, click ‘Use Page's Theme’.
NOTE: If a theme has been applied to your web site, button link bars will use fonts, colours, and other style elements from the theme. If you click Use Page's Theme and your page does not use a theme, the link bar will use the default text of the page.
Click Next. Choose orientation. Click Finish and the ‘Link Bar Properties’ Dialog box opens with the same settings from the previous selection:
If you want a different look, click ‘Create New’ and type a name for your new link bar and modify the style of the back and next links, then click the style tab and make a selection. You can also choose ‘Use Active Graphics’ and ‘Use Vivid colours’.
NOTE: If you select an external page to add, you will be able to link to it (using Back or Next on the link bar, depending on where it is in the list) but not from it (as you cannot add the same link bar to a page outside this web site). Also if you view the Back and Next link bar from the index.htm page there is no back page because you can only move forward through the site from the home page.
Click OK.
Save all the pages and preview in the browser. The Back and Next links now follow in the same order as the link bar, also the order of the pages in the Links box of the Link Bar Properties window also specifies the order in which the back and next links will link.
NOTE: If you change any of the link bars (such as the order or page label) while in Navigation view, the link bars on your web pages will reflect these changes. However, you must right-click the blue background in Navigation view and click Apply Changes on the shortcut menu.
If you clicked the Use Active Graphics check box the button will show a highlight when you mouse over it.
Creating a Changing Link Bar:
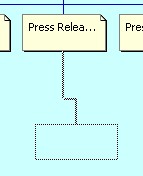
A changing link bar is most useful for sites that have numerous pages listed in their navigational structure. FrontPage includes two powerful features, shared borders and navigation bars, with which you create ‘live’ hyperlinks. They are ‘live' in the sense that they are automatically updated even though you may radically alter the structure of your site. Best of all, FrontPage will give you precise control over which pages are linked, based on their structural relationship to each other, for example you can ask FrontPage to generate hyperlinks to any page above the selected page (known as a parent page), to all pages on the same level as the selected page, or to any page below it’s level (a child page).
FrontPage can also create navigation bars for single pages, make sure you position single-page navigation bars in a border not already being used by a site-wide bar, for example if you have created site-wide navigation bars across the top of all your pages, you will need to put your single-page bar below that area or on the sides or bottom of the page.
Shared borders can only be used for a website though, not single pages, If the shared borders choice appears dimmed this is because you don’t have a website open. However you can turn off shared borders for single pages within the website. Besides using them for navigation, shared borders are also a great place to put any site-wide information that may need regular updating. (More about this in Part III) With shared borders you can change the information in only one place and it will be automatically updated on every page.
Before setting up, you need to order the structure of your site. In Navigation view, do one or more of the following:
ADD AN EXISTING PAGE TO THE CURRENT NAVIGATION STRUCTURE: - Click the page in the Folder List, and drag it to the position in the structure where you want it. If the Folder List is not showing, on the View menu, click Folder List.
MOVE A PAGE WITHIN THE NAVIGATION STRUCTURE: - Click the page, and then drag it to another location, such as under or next to another page.
ADD A TITLE TO A PAGE: - Right-click the page, click Rename on the shortcut menu, and then edit the name.
ADD A NEW PAGE UNDER AN EXISTING PAGE: - Right-click the existing page, point to New, and then click Page on the shortcut menu.
DELETE A PAGE FROM THE NAVIGATION STRUCTURE: - Click the page, and then press DELETE.
NOTE: This does not delete your page from your web site.
TIPS:
1. Save changes without switching views. Right-click on the view background, and then click Apply Changes on the shortcut menu.
2. To open a page to edit it, double-click the page.
3. You might like to PRINT your navigation view to give you a clearer idea on how you want to proceed. In Navigation view, Got to File | Print and specify printing options, such as the printer name and number of copies you want. To see how the navigation structure will appear when printed, click Print Preview on the File menu.
To Set Shared Borders:
Open up the website for which you want to set navigation borders Go to Format | Shared Borders, the ‘Shared Borders’ Dialog box will appear. Choose the ‘All Pages’ radio button. Set the border you want the navigation bar to appear on, you have a choice of left, right, top or bottom and the related ‘Include navigation buttons’. A dashed line will appear within the dialog box showing where the navigation bar(s) will appear.
TIP: Only the Top, left and right choices let you show hyperlinks to other pages. In the ‘Shared borders’ Dialog box, however, you may insert a navigation bar directly from the menu Insert | Navigation.
New Feature: While you are still in the ‘Shared Borders’ Dialog box click the Border Properties button at the bottom of the box, and here you can now Colour the borders or insert a graphic or both for all borders.
Add a Link Bar Based on the Navigation Structure:
In Page view, position the insertion point where you want to place the link bar (In this example the left shared border).
NOTE: When you click in the shared border the dashed line changes to a solid one.
Go to Insert | Navigation, in the right pane click Bar based on navigation structure, click Next. Select the link bar style you want to use for this link bar. Or, if your page uses a theme, click Use Page's Theme. If a theme has been applied to your web site, button link bars will use fonts, colours, and other style elements from the theme. If you click Use Page's Theme and your page does not use a theme, the link bar will use the default text of the page. Click Next.
Choose the page orientation of the link bar (vertical or horizontal), and click Finish. Under Hyperlinks to add to page, select the type of hyperlinks you want on the link bar. (Based on your choices, the squares in the left hand site tree will change to show which pages relative to the current page will be linked. You can add two other links by clicking the additional pages choices) Click OK.
NOTE: The navigation structure for the link bar is determined by the order of pages in Navigation view.
A link bar might seem useful when you view it from one page, but you might not like the selection of hyperlinks when you view the link bar from a different page. Since a link bar inside a shared border has the same settings for all pages using the shared border, you must be careful how you set up the link bar.
Apart from these methods outlined above a much more customised way which requires slightly more maintenance is to use include pages. (More about this in Part III Include Pages). (Step by Step help on making Include Pages)
MenuPlus can customise your navigation bars even up to and including bookmarks you can choose from a number of preset styles, create your own custom version, create a custom style from scratch, or base it on one of the preset styles and even specify the scripting to be placed around the individual parts of the navigation bar by using the tabs at the bottom, if you are familiar with HTML. When you're done creating your custom style, you can then save it for future use. Using the separate Style Manager application included in the package, you can back up your favourite styles (stored in the Registry) to a file. As well as a security measure, this is also a great way to swap styles with others - such as when collaborating on a project. (At the moment) MenuPlus is available for $10.00
First Published in
ABC ~ All 'Bout Computers
Volume 11, April 2002