
FrontPage 2002 Tutorials - How to create a FrontPage Photo Gallery - Troubleshooting graphics in FrontPage 2002 Photogallery
by Tina Clarke
(some tutorials cover FrontPage 2000 as well)
With Microsoft FrontPage® 2002 you can add a collection of photos or other images to your Web site in the form of a visual catalogue. A photo gallery is very useful for visitors to your site because it gives them a quick way to scan a collection of images by reviewing a collection of smaller (thumbnail) images. When visitors view your photo gallery in a browser window, they can choose which images they want to see and click each thumbnail to display the full-size image the thumbnail represents.
How to create a Photo Gallery
- Create a blank page.
- On the menu bar click Insert | Web Component
- Click Photo Gallery in the left pane.
- Select one of the four types of layouts that you want to use in the right pane.
- Click finish.
- The Photo Gallery Properties Dialog box will pop up.
- Click ADD to insert a graphic
NOTE: You can add as many graphics at a time as you want.
From the drop down menu you can either locate pictures from files (either files on your computer, the world wide web or Microsoft Clip Organizer) and Open. Or, bring them in from a scanner or camera, (This can be either a web cam or digital camera).
The ‘Insert Picture from scanner or camera’ dialog box will pop up. From the drop down list under ‘Device’ your devices will be listed, choose one.
If you choose a scanner you can select a custom insert and choose the scanner settings you want.
Just follow the directions you normally would for your device.
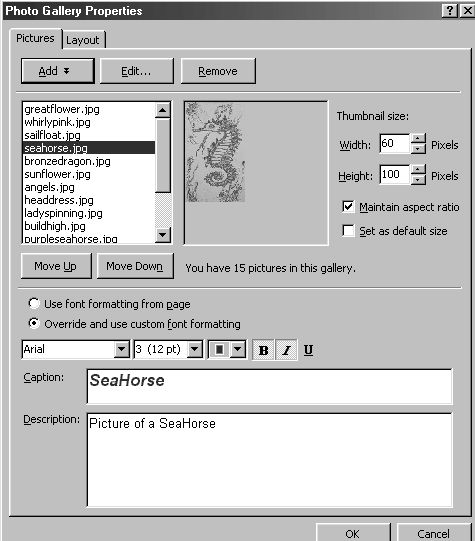
Now you can tweak the settings on the ‘Photo Gallery Properties’ box
Move the pictures up or down according to the order you want your graphics.
Edit - Select the graphic you want to edit by clicking it. A preview of the photo is displayed next to its name
Size: You can change the width or height of the graphic. You can also choose to maintain the aspect ratio, or not, depending upon how you want to change the graphic.
Orientation: You can flip or rotate the graphic: Under Rotate Picture, do one or more of the following:
Click Rotate Left to rotate the graphic 90 degrees counter clockwise.
Click Rotate Right to rotate the graphic 90 degrees clockwise.
Click Flip Vertical to turn the graphic upside down.
Click Flip Horizontal to create a mirror image.
Crop: You can crop the graphic. For example, if you want only part of a graphic visible, crop out the rest.
Under Crop Picture, click Crop.
A cropping box appears on the graphic.
By clicking and dragging the handles on the box, resize the box to include the part of the graphic that you want to keep.
To draw the cropping box yourself, click outside the cropping box but inside the graphic, and then draw the box.
Click Crop again to remove the area outside of the cropping box.
Reset: If you have made changes to the graphic, you can click the Reset button to return the graphic to its original state.
TIP: Click Previous or Next to edit the graphic before or after the one you just edited.
Specify the width and height of the thumbnail under ‘Thumbnail size’. By default, the thumbnails are 100 pixels by 100 pixels in size (a little more than 1 inch by 1 inch square).
NOTE: Thumbnails are automatically created.
Add a caption or description below the graphic
NOTE: If you choose ‘Montage Layout’, the text boxes for ‘Caption’ and ‘Description’ will be greyed out.
Click the graphic that has the caption you want to edit.
A preview of the graphic is displayed next to its name.
In the ‘Caption’ box, type the caption you want to appear under the graphic.
In the ‘Description’ box, type the description you want to appear in the space below the graphic and its caption.
 Change the layout of the photo gallery.
Click the ‘Layout’ tab.
Choose a layout from the list.
View a preview of the layout under ‘Preview’.
Select a number from ‘Number of pictures per row’
Click OK.
NOTE: If you choose Slide Show or Montage Layout, this option will be greyed out.
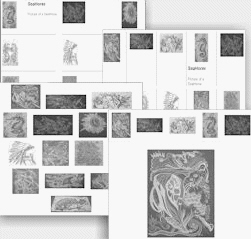
There are four different types of photo gallery layouts available in FrontPage 2002: Horizontal, Vertical, Montage, and Slide Show.
- Use a Horizontal layout when you want your photos to appear in a simple album-style layout.
- Vertical layout also presents your photos in a simple album-style layout, with users viewing images from top to bottom.
- Display your images as a collage with the Montage layout.
- Create a scrolling catalogue of your images with the Slide Show layout. When a thumbnail is selected, the full-size image appears below the row.
You can also apply a theme to a photo gallery just as you would with any other web page.
When you create and add a photo gallery to a site that already has a theme applied, by default the photo gallery will take the same properties. For example: background, formatting, and bullet style are the same as the rest of the pages within the site. However, for captions and photo descriptions, you can choose whether or not you want to use the font formatting from the page's theme or override the theme's formatting and select your own custom font. This feature can be used to make your captions and descriptions stand out from other text on the page
NOTE: If you don't select the text in the Caption and Description boxes before changing the font, the settings you specify will not be applied.
This feature also applies to Web pages that are associated with a cascading style sheet (CSS).
Troubleshooting graphics in FrontPage 2002 PhotoGallery
My thumbnails are looking tired.
To refresh and update your thumbnails back to their previous sparkling look resizing them will restore them to their former glory.
Right click on the photo gallery in Normal View and choose 'Photo Gallery Properties' from the pop up menu or double click the photo gallery.
Select the graphic you want to work with
Check that the 'Maintain Aspect Ratio' box is checked
Change the size in the width box under 'Thumbnail Size' - the default is 100 pixels so select something slightly larger.
Do this for all the thumbnails you want refreshed.
NOTE: If you do this again reset the thumbnails to the default first.
I can't crop part of a photo gallery graphic.
FrontPage can only crop photo gallery images down to a certain size. If you find that your graphic is too large, you can insert it onto a blank page, crop it like you would any other graphic, and then resave it and insert it again into your photo gallery.
Slide Show Photo Gallery Finish button is greyed out.
When you try to insert a Photo Gallery in Slide Show layout you can’t because the Finish button is greyed out. This is because the Slide Show layout only works on browsers that have Java-Script capability. If your compatibility preferences tell FrontPage to suppress features that require JavaScript, FrontPage will suppress the Slide Show Photo Gallery.
To fix this, just turn on JavaScript: In FrontPage on the Tools menu, click Page Options.
When the Page Options dialog box appears, click the Compatibility tab.
In the Available Technologies area, select the JavaScript check box.
Click OK to close the Page Options dialog box.
Now the Slide Show Finish button will be come available.
When I double-click a graphic to edit it in another editor, "No picture editor is configured" appears.
You must first choose the picture editor you want to use to edit your graphics, and you must choose one for each type of graphic (JPEG, GIF, BMP, and so on): On the Tools menu, click Options.
Click the Configure Editors tab.
Click Add.
In the File type box, type the extension of the type of file you want to add. For example, gif or jpg.
In the Editor name box, type the name of the graphics editor you want to use.
In the Command box, type the path to the executable file (.exe) for the editor, or click Browse to locate the file.
Repeat the steps for each type of file to which you want to assign an editor.
My graphic is broken on my web site.
This can be caused by one of the following: You acquired this graphic from another web site When you add a graphic to a web site and then save the page that it's on, you are prompted to save that graphic to the same web site where your page is saved. If you acquired this graphic from a shared location or another web site, and you didn't save it to a folder in your web site, the path to it will be broken if that graphic is removed from the shared location or web site, and it will not display on your web page.
You need to publish the image or the folder where it lives to your Web server If you have a graphic that you are using for a web page located in a local folder, when you publish that web page, you also need to publish the folder where all the graphics are or all your graphics will appear to be broken.
When I click a hot spot, it returns a 404-error message.
This can be caused by one of the following: The destination may have moved or may no longer exist Verify that the file exists by viewing the destination file with your Internet browser if the file is on the Internet, or with Microsoft Windows Explorer if the file is on your hard drive or a network.
You may not have access to the destination. If the destination file is on the Internet, make sure you have a connection to the Internet.
You may be trying to link to a page or directory that does not have anonymous browsing permissions. If the destination is on a network, contact your network administrator to ensure that you have access to the destination file.
There may be a technical problem. If you believe that the file you are linking to exists and that you have permission to link to it, try deleting your temporary Internet files. Open Microsoft Internet Explorer.
On the Tools menu, click Internet Options.
Under Temporary Internet Files, click Delete Files.
When I am resizing a graphic in percentages, the 'Keep aspect ratio' check box appears greyed out.
This behaviour occurs because Microsoft FrontPage bases the percentage width or height of a graphic on a portion of the browser window (or table cell). The aspect ratio is not preserved. If you want to preserve the aspect ratio, you must resize your graphic by entering the width and height size in pixels.
How to make and edit pages that open up in a new window
When you make a FrontPage Photo gallery, a folder is made automatically called photo gallery, and another folder within that named something like photo111816. (The folder is always called photonnn – nnn is always a random number) In here you will find the thumbnails, .JS file and three .htm files. If you open the real.htm file you can edit the photo gallery graphics and do anything you would on a normal page, such as setting the hyperlink target on the thumbnail to open up in a new window, adding alt tags etc. Making the thumbnail hyperlink to a new window, you can make a new page for the larger graphic and then configure the page for background, and add your own text. This looks much smarter. Open real.htm
Select the first graphic
Right click and select ‘Hyperlink’ on the pop up menu.
Click ‘Target Frame’
Select ‘New window’ and ‘Default’.
Save the page.
WARNING: You can do all manner of tweaks this way BUT if you opened the .htm page that the photo gallery has been inserted to and resaved it, all your tweaks will be lost so make sure you don’t need to edit that page again unless you want to redo all your tweaks.
NOTE: Do not edit either the real_p.htm or the real_x.htm files in the photonnn folder. Both of these files are used exclusively by FrontPage and should not be altered.
So you can see the FrontPage Gallery working, I’ve made an example
If you want to see more of my artwork, check out
Abstract Art in the meantime if you wish to commission me, contact me via: TinaClarke@accessfp.net
First Published in
ABC ~ All 'Bout Computers
Volume 21, February 2003