
Creating a web page in FrontPage Express
In this section if you follow the numbered steps you will make a page in a logical order. However the steps are told in brief in this section. I have inserted fuller details on how to accomplish each instruction on other pages. If you are not sure about how to do a step, merely click on the indicated link. For example: Step 1 'Saving your Page' clicking on Open a New Page & Open a new Folder leads you to a table of steps to take with graphic illustrations to enable fuller understanding.
To view a larger version of the thumbnail's just click on them!
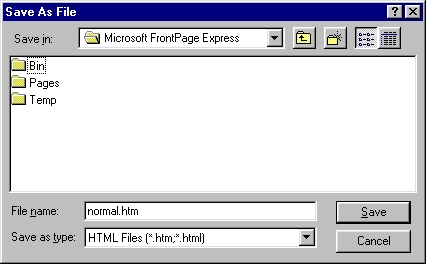
Saving your page:(For fuller details refer to Open a New Page & Open a new Folder) 1 Select "Save" from the "File" menu. Type in a suitable name under "Page Title" and click the "As File" button of the "Save As" dialog box. The "Save As File" dialog box appears: create a new folder for your fledgling Web site and save the document in there. |
 |
| You should still have MS FrontPage open, with a blank Web page saved as index.htm For more help in formatting text click on Text Tools | |
Selecting background:(For fuller details refer to Making a Background & Link & Text Colours) 2 From the "Format" menu, select "Background". In the dialog box that appears, check the "Background Image" box and click "Browse". Select a suitable "background image", click "Open" and then "Ok". |
 |
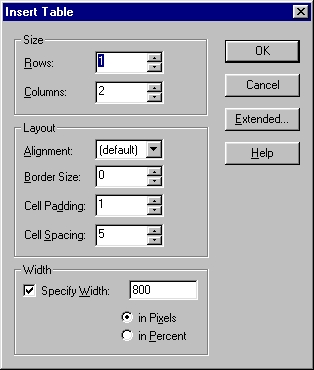
Insert:(For fuller details refer to Using Tables) 3 From the "Table" menu, select "Insert". In the dialog box that appears, specify 1 row, 2 columns, check the "Specify Width" box, type in 800 and click in Pixels. By setting a table size, it gives you more control over the look of your page (rather than having it adapt to the size of the browser window). Specifying 800 means that your table will fit most users' computer screens. |
 |
Cell Properties:4 The outline of a table appears. Click in the first cell, then from the "Table" menu, select "Cell Properties". In the dialog box, under "Minimum Width", click the "Specify Width" check box, type in 140, click on in Pixels and click OK. Repeat, including the previous step, for the other column, this time specifying 650. This makes the first column much narrower than the second.4 The outline of a table appears. Click in the first cell, then from the "Table" menu, select "Cell Properties". In the dialog box, under "Minimum Width", click the "Specify Width" check box, type in 140, click on in Pixels and click OK. Repeat, including the previous step, for the other column, this time specifying 650. This makes the first column much narrower than the second. |
 |
Format:(For fuller details refer to: Typing & Editing Text - 1 & Typing and Editing Text - 2) 5 Click in the right-hand cell and, from the "Format" menu, select "Font". Although you are offered all the fonts available, it's a good idea to confine yourself to fonts that everyone has on "Format": |
|
|
|
|