
FrontPage Express - Using tables
HTML does not format pages in a fixed manner. In other words, the page looks different depending on the size of the browser window and the layout will change dynamically as you resize the window. Sometimes, however, you don't want pages to look different at different sizes and the easiest way to restrict the layout is to use tables. Like images, tables can be set to have 0 (zero) borders so that users never see them. The following text is set inside a table. Adjust the size of the browser and you'll see that it works in a different way to the other pages in this site. To make it more obvious how it works, I have left the table border set to 1 (one) so it is visible.
![]() To insert a table into the page, click on the table icon and it will pop up a grid that you can drag out to define the number of cells in the table. If you have problems using the icon, then you can insert the table from the Table menu. If you do it in this way, then a dialog box will pop up asking you to define the properties. You can choose how many columns and rows make up the table. If you insert a table with only one cell, then you can define the width of the table and insert the text and pictures into the table and as long as you have set that width in the box, then you know that the way that the page looks will be fixed. It's sometimes better though to use tables with additional cells because you can set the alignment and vertical alignment of cells and use them to put a navigation bar on one side and to fix text
with images.
To insert a table into the page, click on the table icon and it will pop up a grid that you can drag out to define the number of cells in the table. If you have problems using the icon, then you can insert the table from the Table menu. If you do it in this way, then a dialog box will pop up asking you to define the properties. You can choose how many columns and rows make up the table. If you insert a table with only one cell, then you can define the width of the table and insert the text and pictures into the table and as long as you have set that width in the box, then you know that the way that the page looks will be fixed. It's sometimes better though to use tables with additional cells because you can set the alignment and vertical alignment of cells and use them to put a navigation bar on one side and to fix text
with images.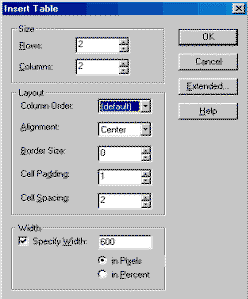
This is best illustrated by trying it for yourself. Set a table with two columns and two rows to make four cells. Then insert a substantial amount of text in one cell and a picture in the one next to it and do the same with the two lower cells. When you view this in a browser, you'll see that the text from the first doesn't continue down to wrap around the second picture.
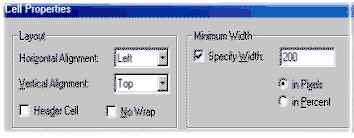
You can go further and define the parameters and dimensions of individual cells. To do this, right click on the cell you want to change and choose Cell Properties. There you can set defined widths and more. Tables appear more complex than they actually are and a little experimentation should make sense of the options.