
FrontPage Express and Images
Adding styles and colours to your text can only go so far to making your web pages look more accessible. Adding pictures to your pages will make your page look more like a "proper" document. However, you must take care when adding pictures, because picture files contain a lot of information, they can be large in terms of Kb. If you make them too large, they will increase the download time for people who access your page. The ways of keeping the file size down are to keep the dimensions of the image down and to keep the number of colours down.
You also need to choose the file type carefully. If the picture is like a photograph and has to contain many colours to look reasonable, then use JPEG files. If the picture is line art or cartoony, where there are few colours, use GIF.
![]() When you have pictures ready to add to your pages, place the cursor in the place in the text where you want the picture to appear and then click on the Insert Image icon in the toolbar. The dialog will allow you to insert an image either from a location on the Web or you can browse the local drive and insert an image from there. Pictures are not embedded into HTML pages, they are only linked. The link is made relative to the position that your HTML page is saved on your disk. When your page is uploaded to the Internet for other people to view, you have to ensure that the same hierarchy is retained or else the image won't be displayed but a broken image link. The easiest way to get around this is to create an Images folder inside the folder that you save your HTML pages while working on them locally. Then make sure all your pictures are in that folder called
Images before inserting them into your pages. You can then copy the pages and Images folder to the server and everything will work as it did on your drive.
When you have pictures ready to add to your pages, place the cursor in the place in the text where you want the picture to appear and then click on the Insert Image icon in the toolbar. The dialog will allow you to insert an image either from a location on the Web or you can browse the local drive and insert an image from there. Pictures are not embedded into HTML pages, they are only linked. The link is made relative to the position that your HTML page is saved on your disk. When your page is uploaded to the Internet for other people to view, you have to ensure that the same hierarchy is retained or else the image won't be displayed but a broken image link. The easiest way to get around this is to create an Images folder inside the folder that you save your HTML pages while working on them locally. Then make sure all your pictures are in that folder called
Images before inserting them into your pages. You can then copy the pages and Images folder to the server and everything will work as it did on your drive.
There's more to using pictures in FrontPage Express than simply inserting them though. If you do this, you'll see that the text does not flow around picture. This is because the tag that controls images in HTML has a lot of parameters. As with other tags though, you don't need to learn these as FrontPage Express offers an interface to this. Either double click on the image in the page or right click on the image and select Image Properties from the context menu. The dialog box that pops up will allow you to control the image fully.
General Tab
On the first tab, General, you will see the reference to the file. You will also see a few other sets of text boxes. The important ones to get used to are the Text and Hyperlink ones. The latter is explained in the Inserting hyperlinks section. The Text box allows you to type in a caption for a picture. This sets up an ALT setting which will pop up the text you enter when the user hovers the cursor over a picture in a browser, as happens on these pages. This only happens in recent browsers. The text is also displayed on the page instead of the picture on browsers where the user has turned the images off, which some people do to keep the downloads fast.
Appearance Tab
The next tab to be looked at is the Appearance tab. On this tab you can adjust the alignment of the picture. When you do change this, and OK the dialog then the picture will range one way and the text will wrap around.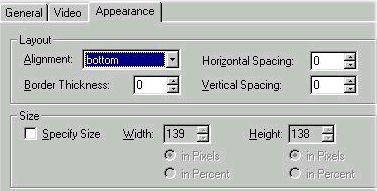 You can also decide on a border size, which puts a border of that pixel thickness around the picture. This is important if you make the picture into a hyperlink, because by default the picture will then have a border and you need to set that to 0 (zero) here to avoid a blue border showing around the image on the page.
Click to View a larger version of the thumbnail.
Below this, is a set of options to change the size of the picture on the page. This requires you to check the tick box, Specify Size. The options then allow you to increase or decrease the size of the image on the page. This does not affect the image file itself, only the size defined in the HTML. You can define a size in pixels or percentages. If you increase the size of a picture, it may appear pixelated. If you decrease the size, then you may be including a picture with a file size larger than is required. However, there are reasons for doing this sometimes - such as if the same picture is used multiple times at different sizes, because only one instance of that picture will be downloaded.
Avoiding place holders
Even if you don't change the size of picture from the original dimensions that FrontPage Express detects when you selected the picture, it is worth checking the Specify Size tick box because while the page downloads, it will layout the page ready for the picture rather than showing an image place holder (which is simply a small picture icon) which will then mean dynamically changing the text layout as pictures are downloaded. In other words, without a specified size, the page appears as text with a picture icon and then as each picture is downloaded, the picture replaces the icon and the text has to move to wrap around the picture, and this looks unprofessional.