
Aligning images with text
Inline images and text
An inline image is any image which is displayed within a paragraph of text. These images are usually small, and tend to be icons used for links, symbols or mathematical formulas. A display image is usually larger, a diagram or a picture, and is usually presented as a 'new paragraph'.
The main issue with inline images is the alignment of the image with the text. Suppose we want to display the formula for the population standard deviation in a page about math's, we have a choice of the three basic alignments top, middle and bottom. The table below demonstrates each of these - real inline images don't have outlines around them of course!
The population standard deviation is given by ![]() where x is the variable
where x is the variable
The default 'bottom' alignment - the bottom of the image is aligned with the bottom of the text line (not the 'descenders' on letters like y)
The population standard deviation is given by ![]() where x is the variable
where x is the variable
The 'middle' alignment - the middle of the image is aligned with the middle of the text. There is a slight difference between the way MS Internet Explorer and Netscape Navigator display middle aligned images, but in ordinary text, there is little difference in practice.
The population standard deviation is given by ![]() where x is the variable
where x is the variable
The 'top' alignment - the top of the image is in line with the top of the text font - i.e. the line above the ascenders.
MS FrontPage makes no distinction between inline images or display images, and you import either kind in exactly the same way, as covered in the last page of these notes. To summarise
- Have MS FrontPage Express running with your Web page loaded, and the image in the same folder as your Web page
- Click in the position in the line of text on your page where you want the inline image to be inserted
- Click the Insert Image button on the toolbar
- In the Image dialog box which appears, click the browse button
- Select the name of your image file from the directory list
- Click OK to insert image
Your image will appear in the line of text, like this ![]() , and now you can
, and now you can
- Double click on the image to bring up the Image Properties dialog box
- Type in some suitable ALT tag text
- Select the Appearance tag of the Image Properties dialog box
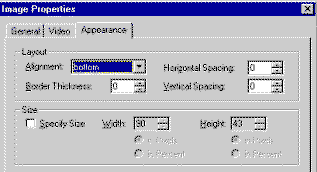
- Select the Alignment from the list in the Layout region of the dialog box
- Add a border if you wish (will not display on Netscape)
- Click OK to accept changes and remove the dialog box.
- Save the changes to your page
- Test the page in the Web browser
If you are using a coloured background, remember to select 'transparent' from the General properties tag. The page colour will then show through the background of the GIF.